Create a free course on the Systeme.io free plan, with auto-enrolment
We built a real free 5-lesson mini-course on Systeme.io's Free plan, with an opt-in page that enrols people automatically and tags them. Every screen, the plan limits it used up, the login email our test signup got, and the gotchas we hit.
We built a free mini-course for WorkCue, Scope a Freelance Project Before You Quote: 5 short text lessons drawn from our 40-point scope checklist. It runs on Systeme.io on the Free plan. People sign up on an opt-in page, get enrolled and tagged automatically, and receive a login email from Systeme.io.
It's live, and it's free: take the course here.
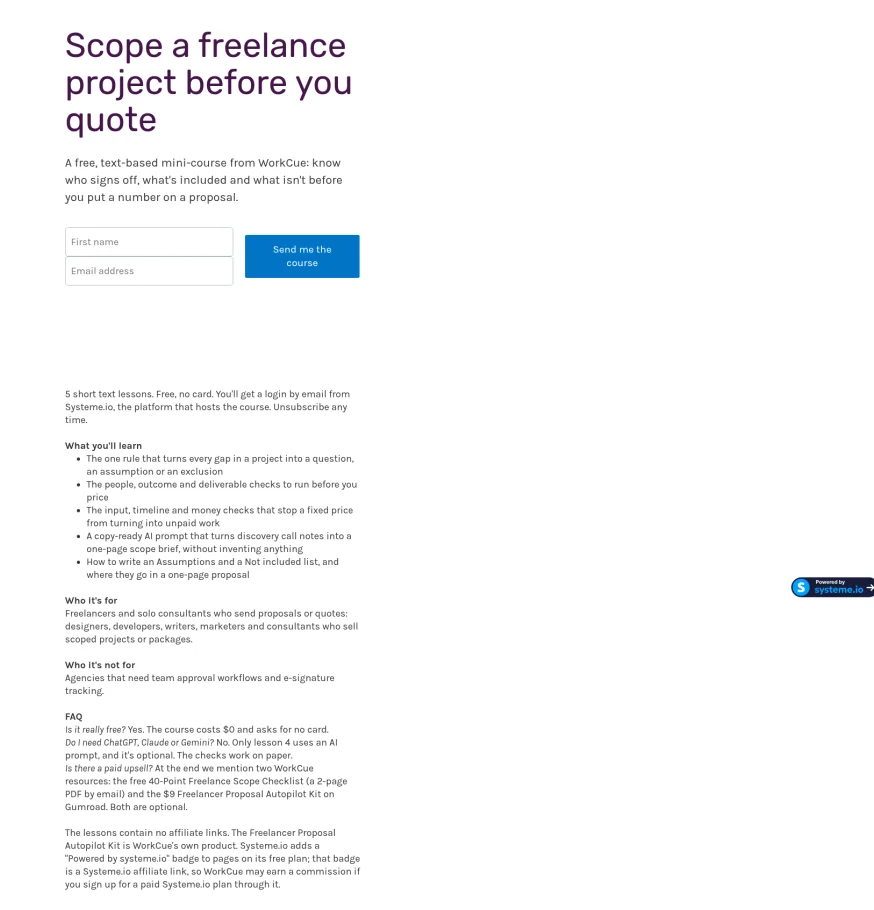
Real numbers: as of October 7, 2026 the course has one student, and that's our own test signup. No real signups yet.
We first planned this on Thinkific, but Thinkific has no free plan and its 30-day trial asks for a card at signup (we checked on October 7, 2026), so we built it on Systeme.io instead.
Step 1: Check what Free leaves you
Open Settings > My plan before you build. Ours already had one funnel (a $9 checkout, see our Systeme.io checkout guide), so the Free column read Contacts 1/2000, Sales funnels 1/3, Sales funnels steps 2/15, and 0/1 for Courses, Automation rules and Tags.
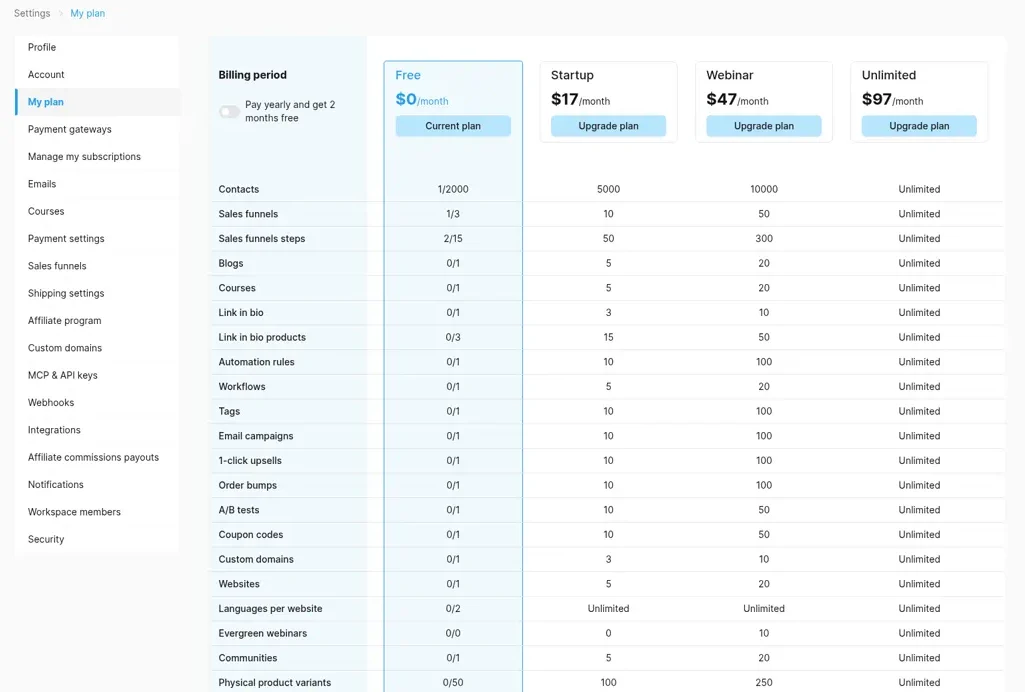
Those three 0/1 rows are the ones that matter. A free course funnel like this one uses all three: the account's one course, one automation rule and one tag. Plan for that before you spend them on something else.
Step 2: Create the course
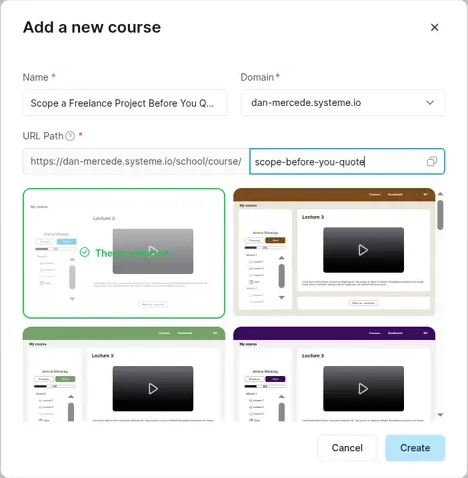
Go to Assets > Courses and add a new course. "Add a new course" asks for:
- Name:
Scope a Freelance Project Before You Quote - Domain: our account subdomain,
dan-mercede.systeme.io - URL Path:
scope-before-you-quote(the full address becomes.../school/course/scope-before-you-quote) - A theme: we kept the first one (Classic)
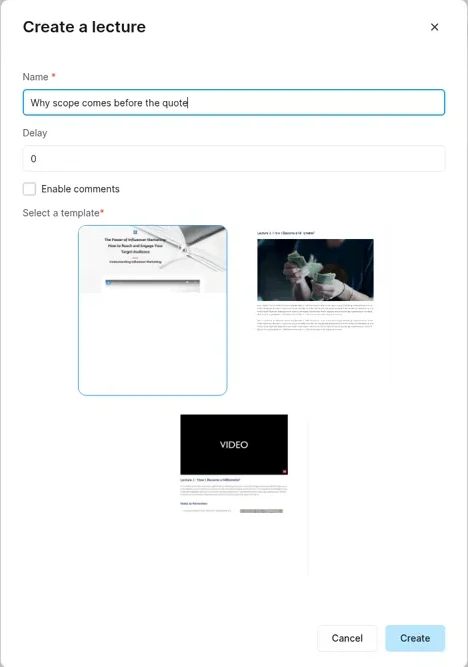
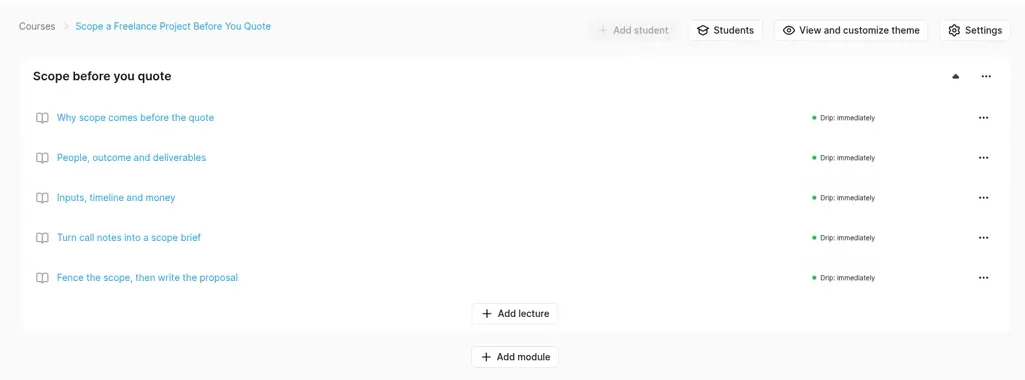
Then Add module (ours: Scope before you quote) and Add lecture for each lesson. "Create a lecture" asks for a Name, a Delay (we left 0), an Enable comments checkbox (off) and a template. There were three templates; we used the first and replaced its contents.
Each lecture opens in the page editor. We pasted each lesson's text into one Text element.
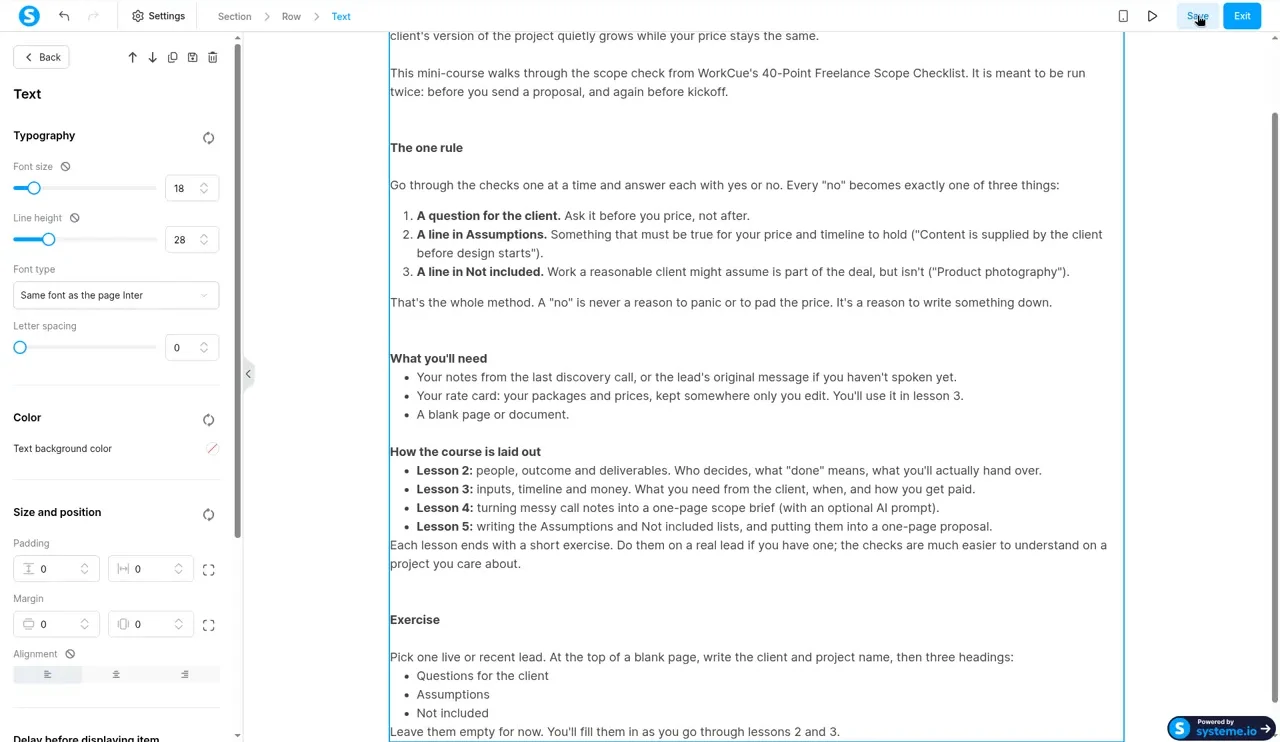
Two paste gotchas:
- Headings didn't survive. Our section headings (H2 and H3) came through as plain text, so we turned them into bold paragraphs. Lists, bold text and links survived.
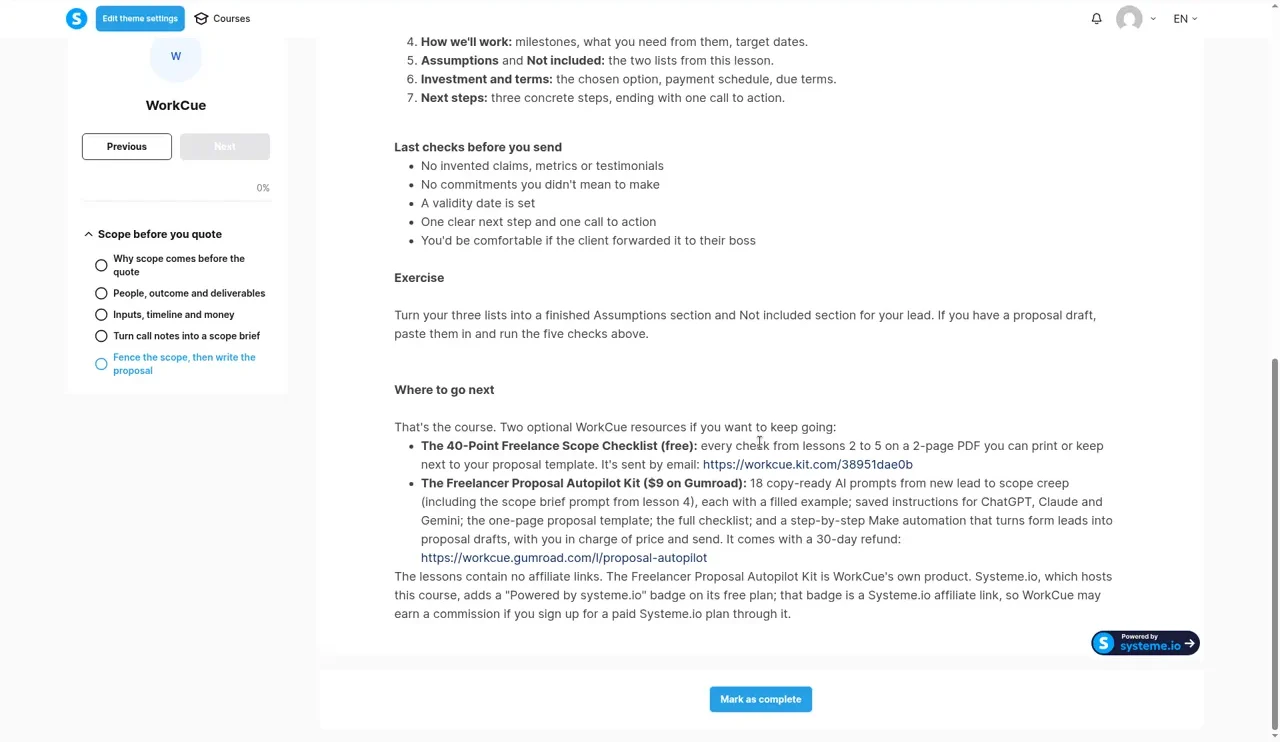
- Systeme.io turns its own name into a link. Every "Systeme.io" in our text became a link to systeme.io (blue in the shot below). We didn't want links we hadn't added, so we broke the auto-link with an invisible character (a zero-width space) inside the word.
New lectures are saved as drafts. Activate each one or students won't see it. With all five active, the curriculum showed each lecture as "Drip: immediately".
Step 3: Course settings
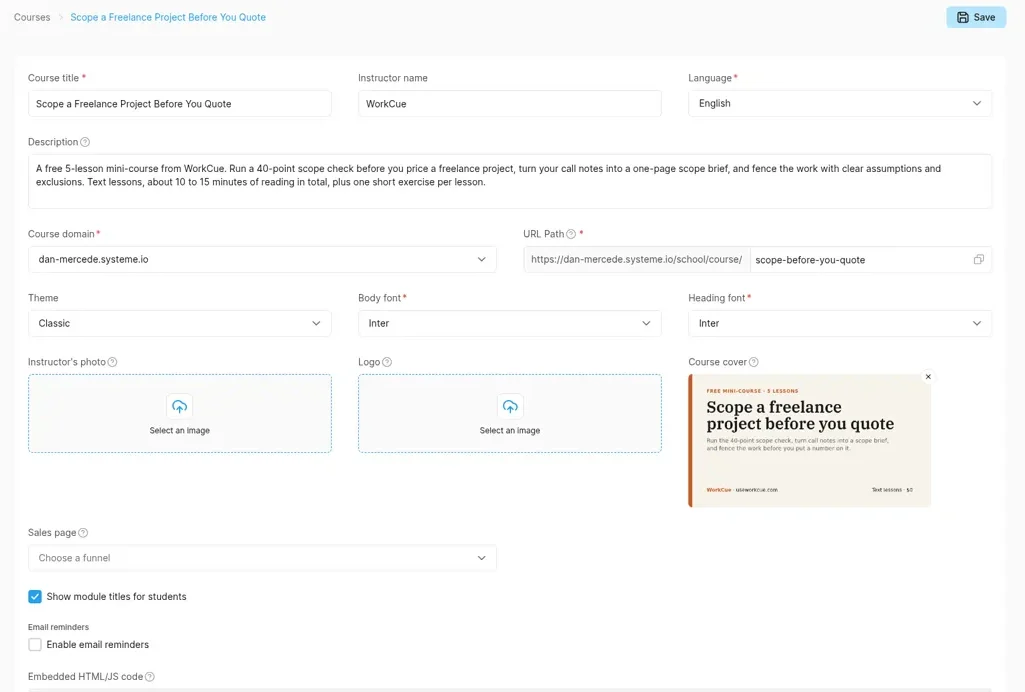
Click Settings on the course. The page has Course title, Instructor name (we used WorkCue), Language, Description, Course domain, URL Path, Theme, body and heading fonts, Instructor's photo, Logo, Course cover (we uploaded our 1280 x 720 cover), Sales page (we left it empty), "Show module titles for students" and "Enable email reminders".
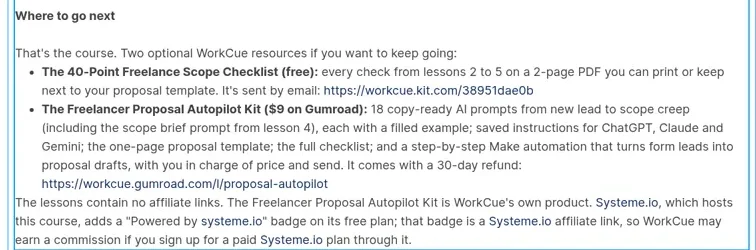
The course preview shows the lectures as students see them. Our lesson 5 links went to the free checklist and the $9 kit, and the "Powered by systeme.io" badge appears on course pages too.
Step 4: Create the opt-in funnel
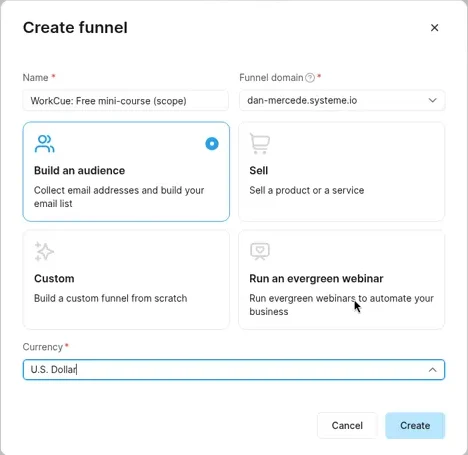
Systeme.io has no free price option or public sign-up link for a course. Its help recommends an opt-in page whose form enrols people (source). Go to Sites > Sales funnels > Create:
- Name:
WorkCue: Free mini-course (scope) - Funnel domain:
dan-mercede.systeme.io - Goal: Build an audience
- Currency: U.S. Dollar
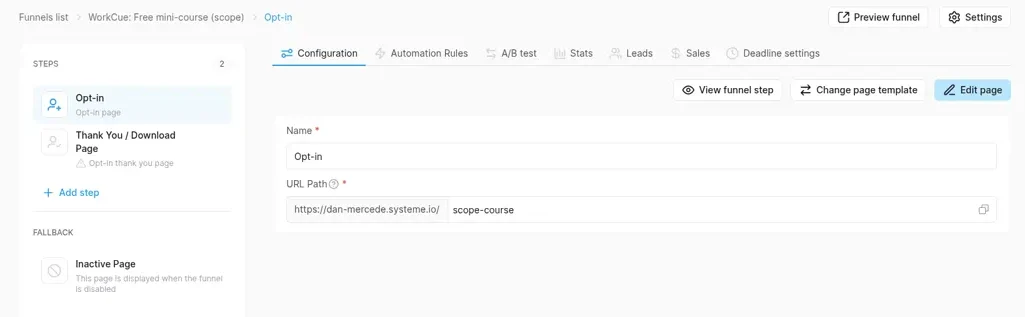
This creates an Opt-in page and a Thank You / Download Page, plus the fallback Inactive Page. We renamed them Opt-in and Thank you and set the URL paths to scope-course and scope-course-thanks. The thank-you path saves as soon as you click away from the field; there's no Save button.
None of the opt-in templates was plain: the first rows were for a volunteer group, a women's charity, wildlife, a law firm and an environmental campaign. Pick the simplest layout with a form and replace everything.
Step 5: Build the opt-in page
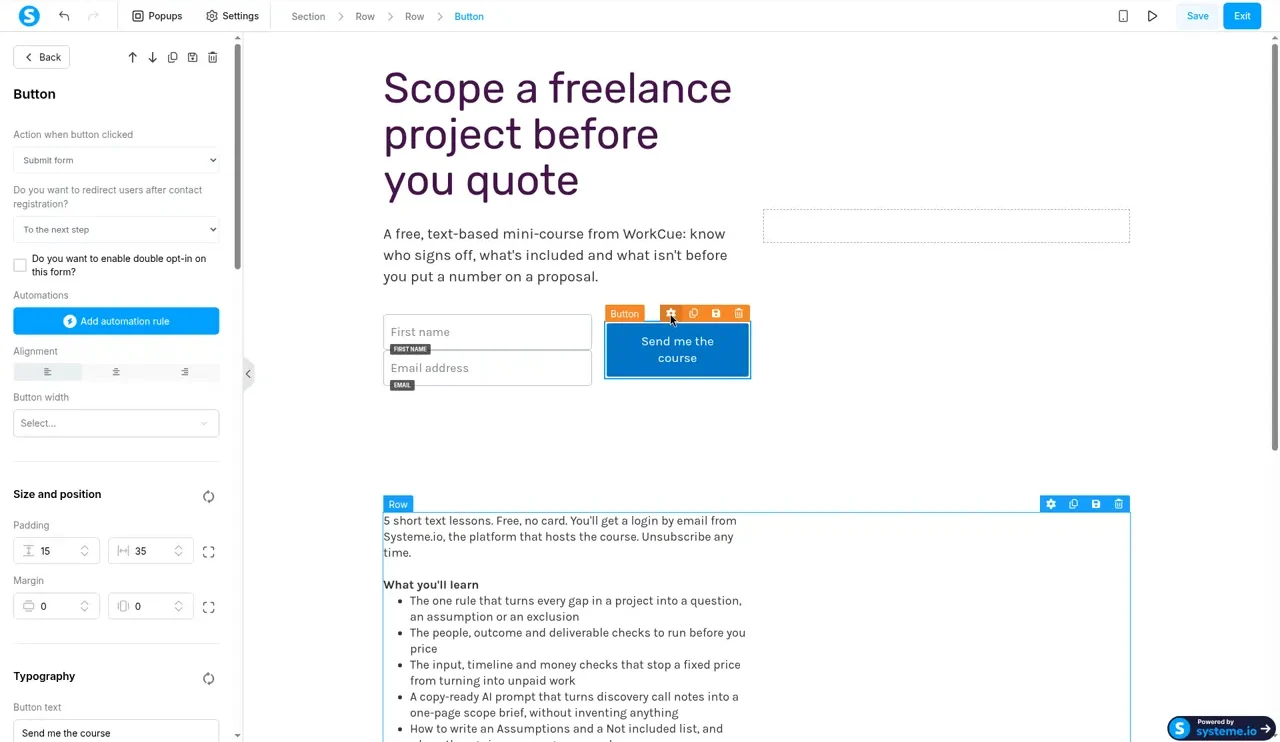
In the editor we wrote the headline, subheadline, a "what you'll learn" list, who it's for and not for, a short FAQ and a disclosure line. The form has two fields, First name and Email, and a button: Send me the course.
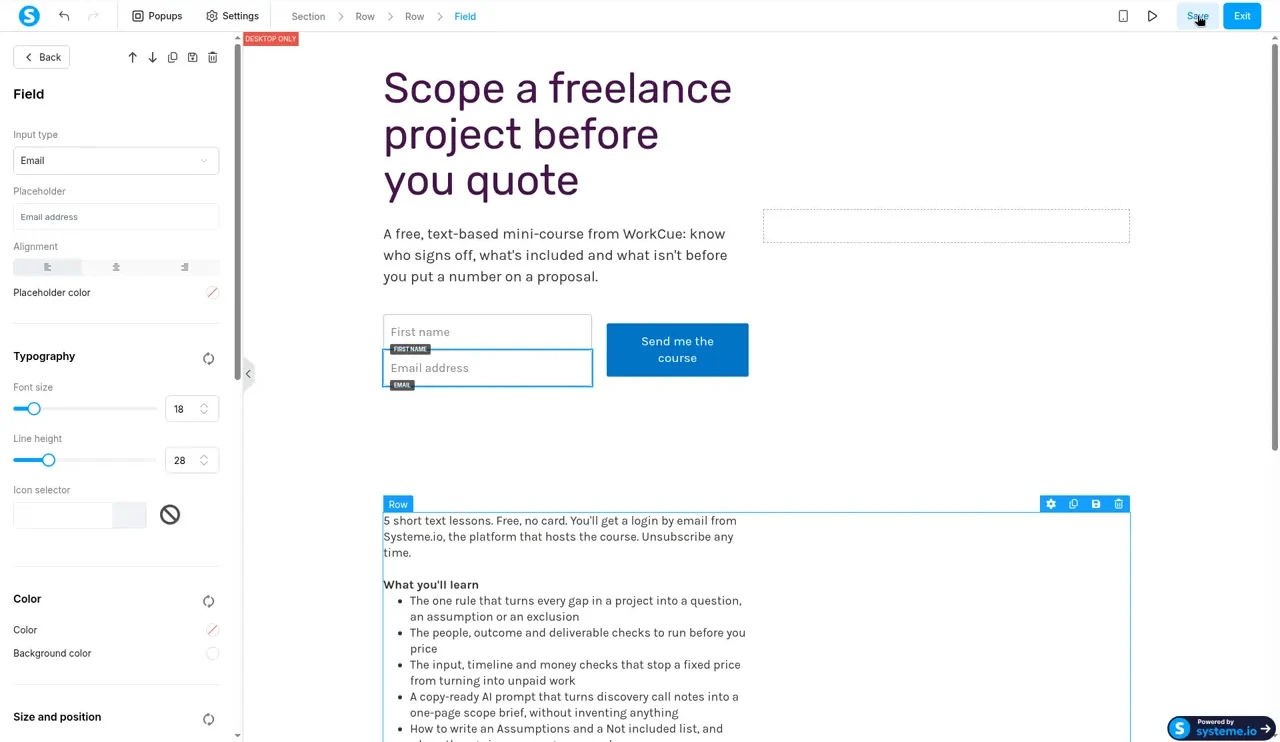
Gotcha: some template sections are device-specific. The hero here is marked DESKTOP ONLY, which means a separate mobile version can exist. Check each section's visibility and the phone view before you publish. We didn't capture the phone view in this run.
Delete everything the template brings that isn't true for you: photos, testimonials, statistics, logos, menus and placeholder contact details. The trash icon sometimes deletes a nested element instead of the section you meant, so check what's selected first.
Click the button and open its settings:
- Action when button clicked: Submit form
- Do you want to redirect users after contact registration?: To the next step
- Double opt-in: off
Step 6: Enrol and tag on submit
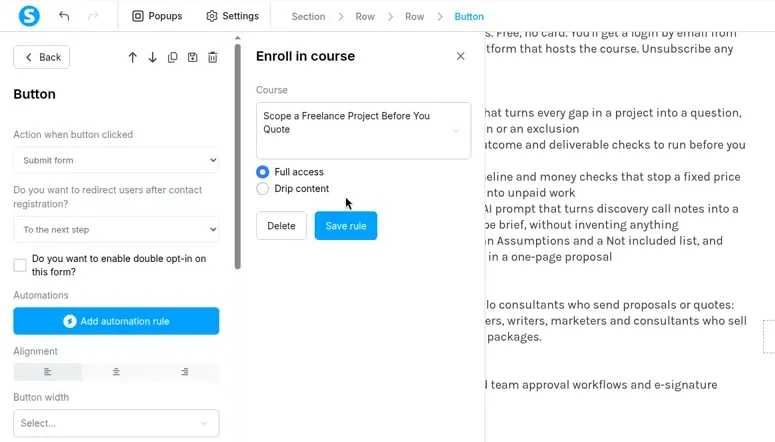
In the same button panel, under Automations, click Add automation rule. We added two actions:
- Enroll in course: our course, Full access (the other choice was Drip content). Save rule.
- Add a tag:
mini-course-scope.
Gotcha: the tag picker can't create tags. Create the tag first under CRM > Tags, then reload the editor and pick it.
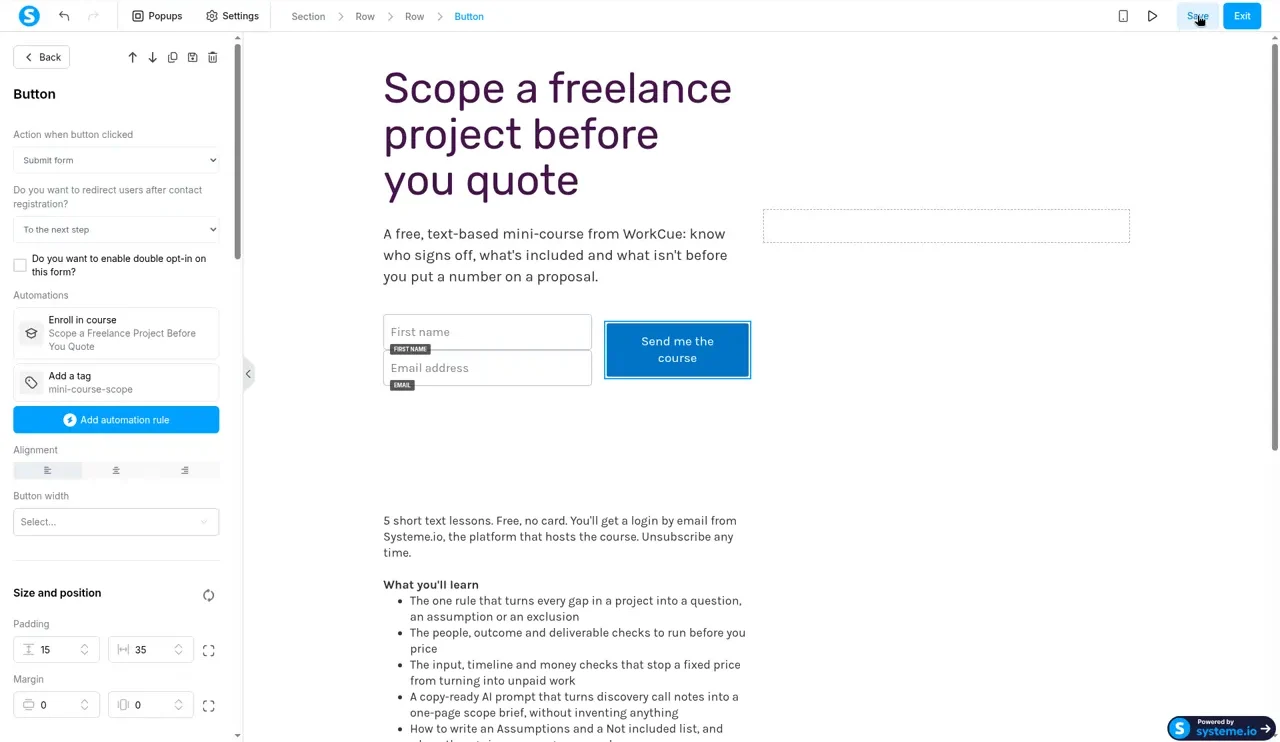
We added no Send email action. Systeme.io sends its own login email when someone is enrolled (Step 9). After saving, My plan counted this as Automation rules 1/1 and Tags 1/1.
Step 7: The thank-you page
The thank-you template had a header, a footer and a demo email box (sender@example.com) to delete. Our text: "You're in. Check your inbox.", that Systeme.io is sending the login, what to do if it doesn't arrive, and the address of our free checklist.

Step 8: Who the login email comes from
Before testing, look at Settings > Emails (the address is /dashboard/profile/mailing-settings). We verified hello@useworkcue.com there through the link Systeme.io emailed us, and it showed Verified, but with a warning: "To send emails from this email address, you need to authenticate its domain." The Sender dropdown didn't offer it. Until the domain is authenticated (DNS records, under Setup domain authentication), Systeme.io sends from a systemeapp.com address built from your login email, with your chosen sender name. Ours was "Dan at WorkCue".
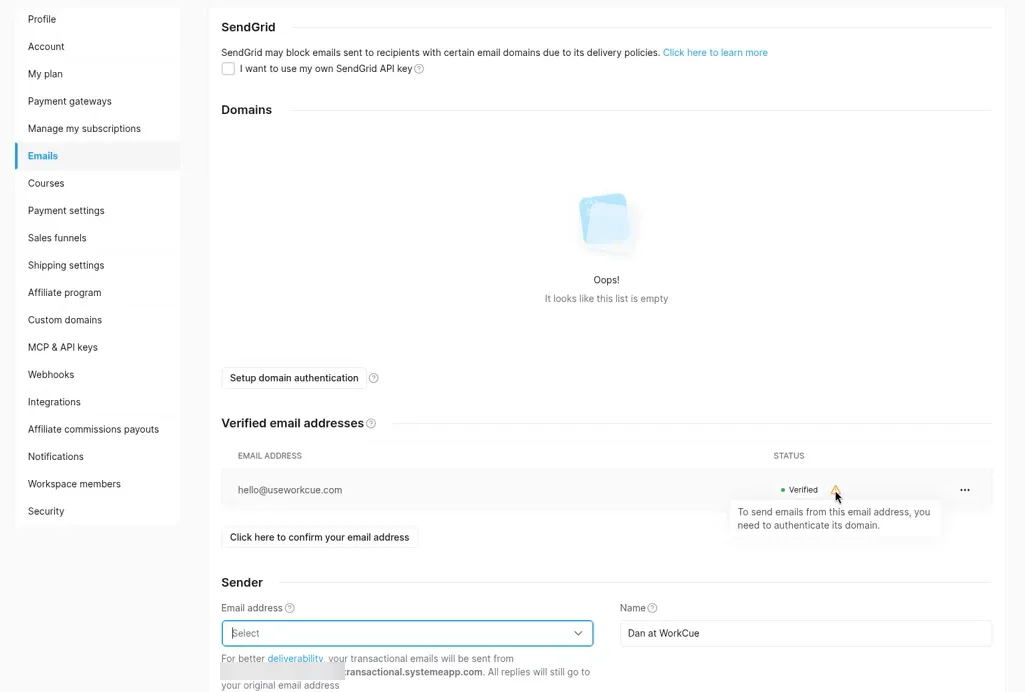
Domain authentication: set up, still Pending at publish time
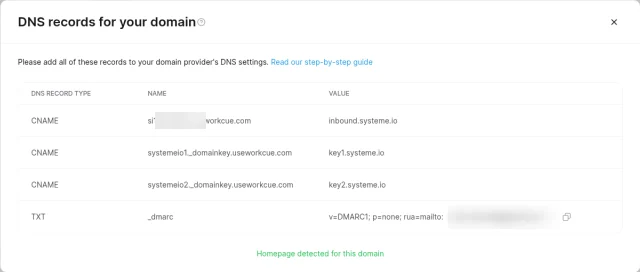
Setup domain authentication asks for the domain, then lists the DNS records to add (the eye icon under DNS settings opens them again). Ours were four:
- three CNAMEs:
si<account-id>pointing toinbound.systeme.io,systemeio1._domainkeypointing tokey1.systeme.io, andsystemeio2._domainkeypointing tokey2.systeme.io - a DMARC TXT record on
_dmarc:v=DMARC1; p=none; rua=mailto:followed by an address picked from a dropdown, which offered our account's login email
It didn't ask for any SPF change.
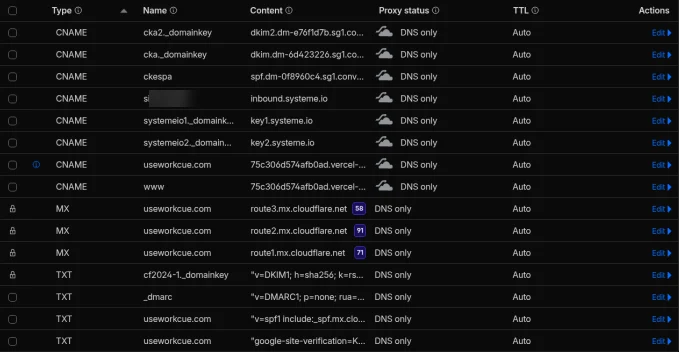
Our DNS is on Cloudflare's free plan. We added the three CNAMEs at about 9:42 PM PT on October 7, 2026, each with proxy status DNS only (grey cloud).
We didn't add Systeme.io's DMARC record. useworkcue.com already had one from our Kit setup (p=none, reports to our own hello@ address; see our Kit sending domain guide). A domain should have only one DMARC record, so we kept ours and left SPF unchanged. Whether Systeme.io accepts the existing record, we don't know yet.
A public DNS lookup (Cloudflare's DNS-over-HTTPS resolver) returned all three CNAMEs a few minutes later. Systeme.io's page has no button to re-check; the status still said Pending when we reloaded it at 9:44, 9:46 and 9:48 PM PT.
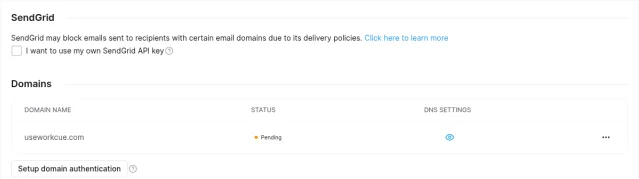
When we published this guide the domain was still Pending, so every email below came from the systemeapp.com fallback address. We'll update this guide when it verifies, including whether hello@useworkcue.com then shows up under Sender.
Step 9: Test with your own address
We opened the live opt-in page, entered first name WC Test03 and our own labelled test address, and clicked Send me the course. The thank-you page loaded.
One note if you automate tests: a scripted click on the live button didn't submit the form for us, but a real mouse click did.

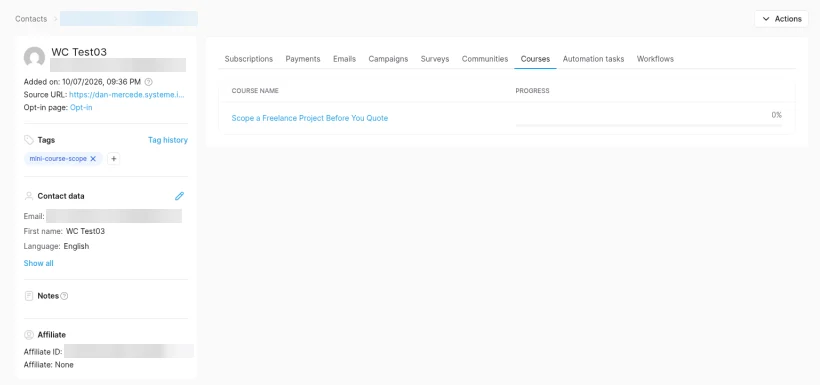
In CRM > Contacts, the new contact had the tag mini-course-scope, the opt-in page as its source, and the course under Courses at 0%.
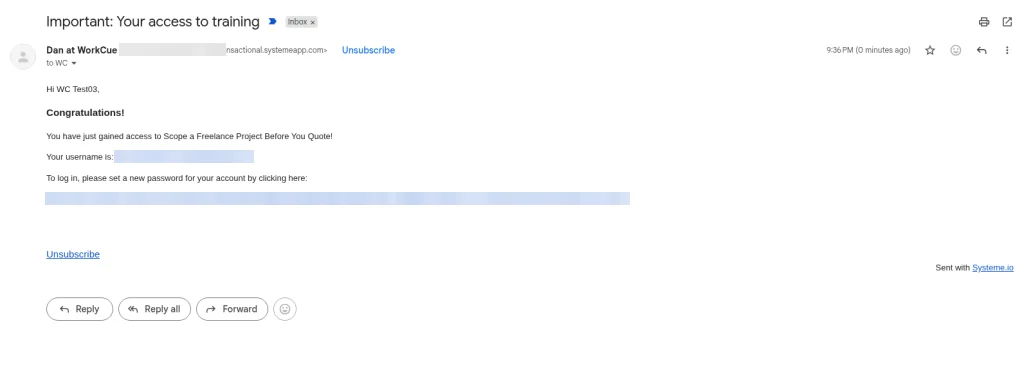
The login email arrived in under a minute, in the Gmail Inbox: subject "Important: Your access to training", from "Dan at WorkCue" at a transactional.systemeapp.com address. It says "Congratulations!", names the course, gives the username and a link to set a password. The footer says "Sent with Systeme.io" (an affiliate link for Systeme.io, which can't be removed on Free) with an Unsubscribe link. Systeme.io's help says this email can't be edited (source).
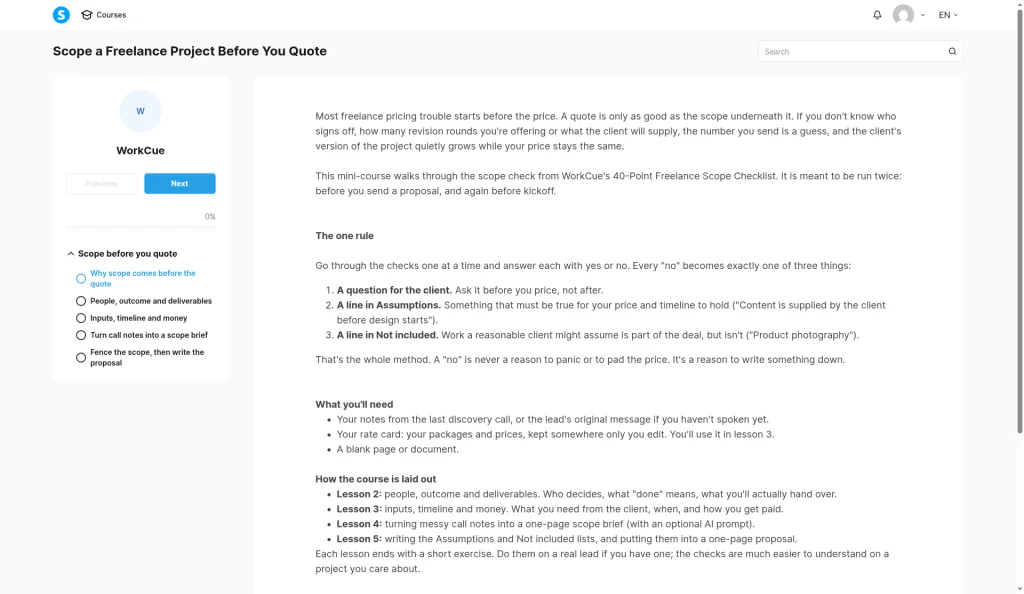
We set a password through the link and landed in the course on lecture 1. One honest caveat: this was in the same browser we'd used as the course owner, so the view below may have been under the owner's session rather than a clean student one.
Step 10: Plan usage after
Back in Settings > My plan: Contacts 2/2000, Sales funnels 2/3, Sales funnels steps 4/15, Courses 1/1, Automation rules 1/1, Tags 1/1, Students 1/500.
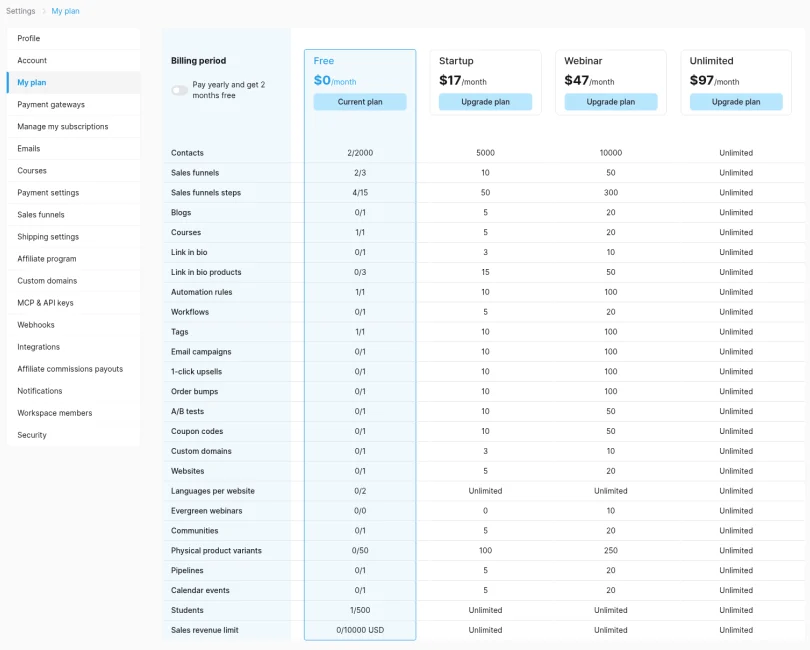
What that means: one free course funnel uses up the Free plan's single course, single automation rule and single tag. You can't add a welcome sequence, a second course, a purchase follow-up email or another tag-based automation without removing this or upgrading. We have one funnel slot left.
What the free plan did and didn't allow
Allowed on Free in this run: a 5-lecture course with a cover, an opt-in funnel, automatic enrolment and tagging, Systeme.io's automatic login email, and publishing on the systeme.io subdomain.
Limits we hit: 1 course, 1 automation rule and 1 tag, all used by this one funnel. Sending from our own domain needs domain authentication. The "Powered by systeme.io" badge and the "Sent with Systeme.io" email footer stay on Free.
Recap
- On Systeme.io, a free course is an opt-in form whose button enrols the contact. On Free, that one funnel uses the account's only course, rule and tag.
- Create the tag in CRM > Tags before you add it to the rule, and activate every lecture.
- Watch the paste: headings flatten, and "Systeme.io" turns itself into a link.
- A verified sender address isn't enough. Authenticate the domain, or your emails go out from a systemeapp.com address.
The course is free: take it here. For selling a download on the same Free plan, see our Systeme.io checkout guide. The rest of the series is on the Sell What You Know hub.
Related guides
Sell a digital download on the Systeme.io free plan with Stripe
We set up a real $9 checkout for our Freelancer Proposal Autopilot Kit on Systeme.io's Free plan: Stripe connection, product and price plan, a trimmed order form and a download button on the thank-you page. What worked, what we had to work around, and what we could not test.
Set up Kit on the free plan: sender, first form and a test subscriber
How we set up WorkCue's real Kit account on the free plan: signup, onboarding, what the plan includes, the sender and mailing address, Recommendations, a first inline form and a test subscriber taken all the way to Confirmed, with the gotchas we hit.
Deliver a PDF lead magnet with a Kit landing page on the free plan
We built the Kit landing page that delivers WorkCue's free 40-point scope checklist, on Kit's free plan: the Beacon template, double opt-in that starts the download, the confirmation email, publishing and an end-to-end test that landed in the Gmail Inbox.